Resolved problem that ESlint HTML report is not displayed correctly in Jenkins job

I’m just documenting to myself that it was solved by following.

When I want to integrate the ESlint report with Jenkins. I encourage a problem

That is eslint-report.html display different with it on my local machine, and I also log to Jenkins server and grab the eslint-report.html to local, it works well.

I used HTML Publisher plugin to display the HTML report, but only the ESlint HTML report has problems other report work well, so I guess this problem may be caused by Jenkins.

Finally, I find it. (Stackoverflow URL)

Follow the below steps for solution

  1. Open the Jenkin home page.
  2. Go to Manage Jenkins.
  3. Now go to Script Console.
  4. And in that console paste the below statement and click on Run.
System.setProperty("hudson.model.DirectoryBrowserSupport.CSP", "")
  1. After that, it will load CSS and JS.

According to Jenkins’s new Content Security Policy and I saw No frames allowed.

That is exactly the error I get on chrome by right-clicking on Elements.
Git 常见设置指北

在使用 Git 提交代码之前,建议做以下这些设置。

叫指南有点夸张,因为它在有些情况下下不适用,比如你已经有了 .gitattributes.editorconfig 等文件,那么有些设置就不用做了。

因此暂且叫他指北吧,它通常情况下还是很有用的。

废话不多说,看看都需要哪些设置吧。

1. 配置 name 和 email

# 注意,你需要将下面示例中我的 name 和 email 换成你自己的
$ git config --global user.name "shenxianpeng"
$ git config --global user.email "xianpeng.shen@gmail.com"

对于,我还推荐你设置头像,这样方便同事间的快速识别。

当你不设置头像的时候,只有把鼠标放到头像上才知道 Pull Request 的 Reviewers 是谁(来自于Bitubkcet)。

2. 设置 core.autocrlf=false

为了防止 CRLF(windows) 和 LF(UNIX/Linux/Mac) 的转换问题。为了避免在使用 Git 提交代码时出现历史被掩盖的问题,强烈建议每个使用 Git 的人执行以下命令

$ git config --global core.autocrlf false
# 检查并查看是否输出 "core.autocrlf=false",这意味着命令设置成功。
$ git config --list

如果你的项目底下已经有了 .gitattributes.editorconfig 文件,通常这些文件里面都有放置 CRLF 和 LF 的转换问题的设置项。

这时候你就不必特意执行命令 git config --global core.autocrlf false

3. 编写有规范的提交

我在之前的文章里分享过关于如何设置提交信息规范,请参看《Git提交信息和分支创建规范》

4. 提交历史的压缩

比如你修改一个 bug,假设你通过 3 次提交到你的个人分支才把它改好。这时候你提 Pull Request 就会显示有三个提交。

如果提交历史不进行压缩,这个 PR 被合并到主分支后,以后别人看到你这个 bug 的修复就是去这三个 commits 里去一一查看,进行对比,才能知道到底修改了什么。

压缩提交历史就是将三次提交压缩成一次提交。

可以通过 git rebase 命令进行 commit 的压缩,比如将最近三次提交压缩成一次可以执行

git rebase -i HEAD~3

5. 删除已经 merge 的分支

有些 SCM,比如 Bitbucket 不支持默认勾选 Delete source branch after merging,这个问题终于在 Bitbucket 7.3 版本修复了。详见 BSERV-9254BSERV-3272 (2013年创建的)。

注意在合并代码时勾选删除源分支这一选项,否则会造成大量的开发分支留在 Git 仓库下。


如果还需要哪些设置这里没有提到的,欢迎补充。

Branch Naming Convention

Why need branching naming convention

To better manage the branches on Git(I sued Bitbucket), integration with CI tool, Artifactory, and automation will be more simple and clear.

For example, good unified partition naming can help the team easily find and integrate without special processing. Therefore, you should unify the partition naming rules for all repositories.

Branches naming convention

main branch naming

In general, the main’s branch names most like master or main.

Development branch naming

I would name my development branch just called develop.

Bugfix and feature branches naming

For Bitbucket, it has default types of branches for use, like bugfix/, feature/.
So my bugfix, feature combine with the Jira key together, such as bugfix/ABC-1234 or feature/ABC-2345.

Hotfix and release branches naming

For hotfix and release, my naming convention always like release/1.1.0, hotfix/1.1.0.HF1.

Other branches

Maybe your Jira task ticket you don’t want to make it in bugfix or feature, you can name it to start with task, so the branch name is task/ABC-3456.

If you have to provide diagnostic build to custom, you can name your branch diag/ABC-5678.

Summary

Anyway, having a unified branch naming convention is very important for implement CI/CD and your whole team.

Related Reading: Git Branch Strategy (Chinese)

How to download the entire folder artifacts when Artifactory "Download Folder functionality is disabled"?

Problem

When you do CI with JFrog Artifactory when you want to download the entire folder artifacts, but maybe your IT doesn’t enable this function, whatever some seasons.

You can try the below JFrog Artifactory API to know if you’re using Artifactory whether allowed to download the entire folder artifacts.

just visit this API URL: https://den-artifactory.company.com/artifactory/api/archive/download/team-generic-release-den/project/abc/main/?archiveType=zip

You will see an error message returned if the Artifactory is not allowed to download the entire folder.

{
"errors": [
{
"status": 403,
"message": "Download Folder functionality is disabled."
}
]
}

More details about the API could find here Retrieve Folder or Repository Archive

Workaround

So to be enabled to download entire folder artifacts, I found other JFrog Artifactory APIs provide a workaround.

How to download the entire folder artifacts programmatically? this post will show you how to use other Artifactory REST API to get a workaround.

1. Get All Artifacts Created in Date Range

API URL: Artifacts Created in Date Range

This is the snippet code I use this API

# download.sh

USERNAME=$1
PASSWORD=$2
REPO=$3

# which day ago do you want to download
N_DAY_AGO=$4
# today
START_TIME=$(($(date --date="$N_DAY_AGO days ago" +%s%N)/1000000))
END_TIME=$(($(date +%s%N)/1000000))

ARTIFACTORY=https://den-artifactory.company.com/artifactory

if [ ! -x "`which sha1sum`" ]; then echo "You need to have the 'sha1sum' command in your path."; exit 1; fi

RESULTS=`curl -s -X GET -u $USERNAME:$PASSWORD "$ARTIFACTORY/api/search/creation?from=$START_TIME&to=$END_TIME&repos=$REPO" | grep uri | awk '{print $3}' | sed s'/.$//' | sed s'/.$//' | sed -r 's/^.{1}//'`
echo $RESULTS

for RESULT in $RESULTS ; do
echo "fetching path from $RESULT"
PATH_TO_FILE=`curl -s -X GET -u $USERNAME:$PASSWORD $RESULT | grep downloadUri | awk '{print $3}' | sed s'/.$//' | sed s'/.$//' | sed -r 's/^.{1}//'`

echo "download file path $PATH_TO_FILE"
curl -u $USERNAME:$PASSWORD -O $PATH_TO_FILE
done

Then you just use this as: sh download.sh ${USERNAME} ${PASSWORD} ${REPO_PATH} ${N_DAY_AGO}

2. Get all artifacts matching the given Ant path pattern

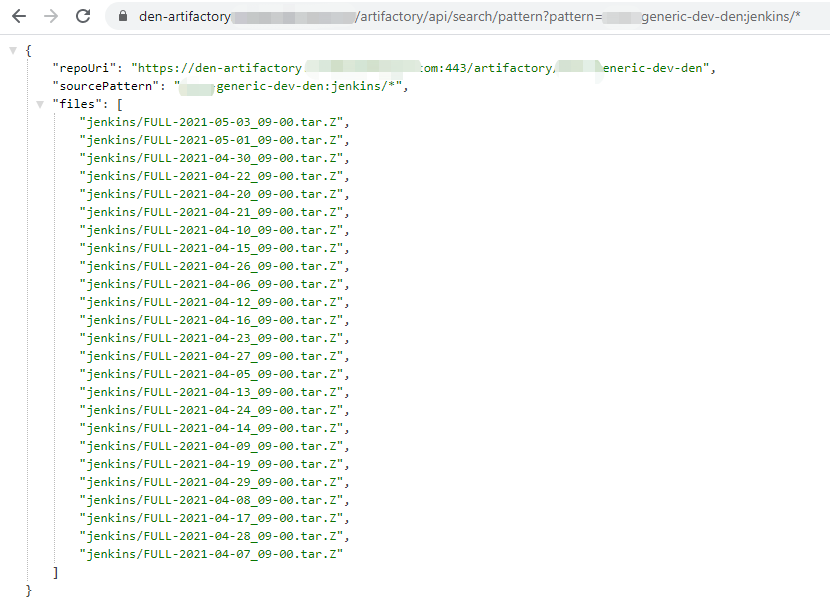
More about this API see: Pattern Search

Take an example screenshot of pattern search:

Then you can use Shell, Python language to get the file path from the response, then use curl -u $USERNAME:$PASSWORD -O $PATH_TO_FILE command to download the file one by one.

If you have better solutions, suggestions, or questions, you can leave a comment.

Why Windows Installer pop up? (Resolved)

What’s the problem?

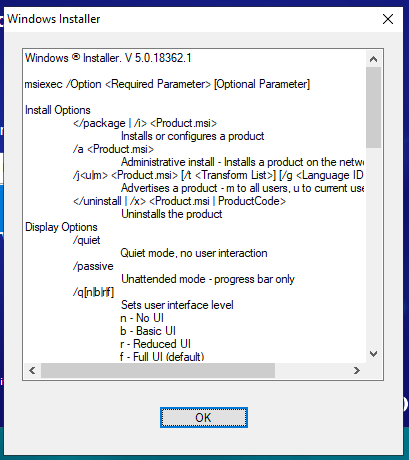
Today I am having a problem where the Windows installer I created is not installing, and the following Windows installer box pops up.

But it works well in the previous build, and I didn’t make any code changes. It is strange, actually fix this problem is very easy but not easy to find.

How to fix it?

In my case, I just remove the space from my build folder naming. I have made follow mistakes:

My previous build name is v2.2.2.3500-da121sa-Developer, but for this build, I named it to v2.2.2.3500-32jkjdk - Developer

How to find the solution?

This problem takes me several hours until I google this article which inspired me.

Just like the above article, if I try to use the command line msiexec.exe other-commands ..., compare with the works installer will also quick to find the root cause.

I realized it immediately I should try to remove the spaces from the build folder… Wow, the installer back to work.

If this happens to you, I hope it also works for you, and leave a comment if it works for you.

JaCoCo 代码覆盖率实践分享

本文适用的是 Gradle 来构建和适用 JaCoCo。

分别介绍了 build.gradle 的文件配置,执行测试和生成报告,报告参数说明,以及如何忽略指定的包或类从而影响测试覆盖率的结果。

build.gradle 文件配置

比如使用 gradle 来管理的项目可以在 build.gradle 里添加如下代码

plugins {
id 'jacoco'
}

jacoco {
toolVersion = "0.8.5"
}

test {
useJUnitPlatform()
exclude '**/**IgnoreTest.class' // 如果有 test case 不通过,如有必要可以通过这样忽略掉
finalizedBy jacocoTestReport // report is always generated after tests run
}

jacocoTestReport {
dependsOn test // tests are required to run before generating the report
reports {
xml.enabled true
csv.enabled false
html.destination file("${buildDir}/reports/jacoco")
}
}

执行测试,生成代码覆盖率报告

然后执行 gradle test 就可以了。之后可以可以在 build\reports\jacoco 目录下找到报告了。

JaCoCo报告

重点是如何分析报告。打开 index.html,报告显示如下:

JaCoCo报告首页

报告参数说明

Read More

你的 Python 代码够不够 Pythonic?

Python 不必多说,它是众多编程语言中最容易学习的动态类型语言。它的跨平台、易读、易写、丰富的 Packages 等众多特性,也是众多DevOps/测试/开发工程师是最常用的语言之一。

相信不少人用它完成了很多工作,但你是不是仅仅止步于功能的实现而忽略了去写出更加简洁,优美的 Pythonic 代码呢?

在我最开始用 Python 时,我还不知道 Pythonic 这个词,直到多年前一位资深的程序员在给我培训的时候提到了项目中有一些代码不够 Pythonic,需要重构。根据语境,我理解他的意思:就是 Python 的代码没有按照 Python 的方式来写。

什么是 Pythonic

充分利用 Python 语言的特性来产生清晰、简洁和可维护的代码。Pythonic 的意思是指代码不仅仅是语法正确,而是遵循 Python 社区的惯例,并以其预期的方式使用该语言。

举例

以下是 C/C++ 程序员的一段代码:

int a = 1;
int b = 100;
int total_sum = 0;
while (b >= a) {
total_sum += a;
a++;
}

如果没有学习 Python 编程模式,那么将上面的代码改用 Python 来写可能会是这样:

a = 1
b = 100
total_sum = 0
while b >= a:
total_sum += a
a += 1

如果用 Pythonic 的方式来写,应该是这样的:

total_sum = sum(range(1, 101))

再举个常见的例子,如果用 Java 可能是这样写出来一个 For 循环

for(int index=0; index < items.length; index++) {
items[index].performAction();
}

在 Python中,使用以下方法会更干净一些:

for item in items:
item.perform_action()

甚至是一个生成器表达式:

(item.some_attribute for item in items)

因此,从本质上讲,当有人说某件事情不符合 pythonic 时,他们是在说这段代码可以用一种更适合 Python 编码风格的方式来重新编写。
另外,去了解 Python Built-in Functions,而不是重新造轮子。

关于 Pythonic 的“官方介绍”

其实,Python 命令行里已经秘密“隐藏”了关于 Pythonic 的介绍。只要打开 Python 控制台,输入 import this,你就能看到:

C:\Users\xshen>python
Python 3.8.6 (tags/v3.8.6:db45529, Sep 23 2020, 15:52:53) [MSC v.1927 64 bit (AMD64)] on win32
Type "help", "copyright", "credits" or "license" for more information.
>>> import this
The Zen of Python, by Tim Peters

Beautiful is better than ugly.
Explicit is better than implicit.
Simple is better than complex.
Complex is better than complicated.
Flat is better than nested.
Sparse is better than dense.
Readability counts.
Special cases aren't special enough to break the rules.
Although practicality beats purity.
Errors should never pass silently.
Unless explicitly silenced.
In the face of ambiguity, refuse the temptation to guess.
There should be one-- and preferably only one --obvious way to do it.
Although that way may not be obvious at first unless you're Dutch.
Now is better than never.
Although never is often better than *right* now.
If the implementation is hard to explain, it's a bad idea.
If the implementation is easy to explain, it may be a good idea.
Namespaces are one honking great idea -- let's do more of those!
>>>

直译过来是:Tim Peters 的《Python的禅意》

美丽的比丑陋的好。
明确的比含蓄的好。
简单的比复杂的好
复杂的比复杂的好
扁平的比嵌套的好。
稀疏比密集好。
可读性很重要。
特殊情况不特殊,不足以打破规则。
虽然实用性胜过纯粹性。
错误永远不应该默默地通过。
除非明确沉默。
在面对模棱两可的情况下,拒绝猜测的诱惑。
应该有一个--最好只有一个--明显的方法。
虽然这种方式一开始可能并不明显,除非你是荷兰人。
现在总比不做要好。
虽然从不比现在*好。
如果实现很难解释,那就是个坏主意。
如果实现很容易解释,它可能是个好主意。
命名空间是一个非常棒的想法--让我们做更多的命名空间!

关于 Pythonic 你 get 到了吗?

Different branches have different default parameters in Jenkins

Problem

When you use Jenkins multibranch pipeline, you may want to have different default parameters settings for defferent branches build.

For example:

For develop/hotfix/release branches, except regular build, you also want to do some code analyzes, like code scanning, etc.
For other branches, like feature/bugfix or Pull Request that you just want to do a regular build.

So you need to have dynamic parameter settings for your multibranch pipeline job.

Solution

So for these cases, how to deal with Jenkins multibranch pipeline. Here are some code snippet that is works well in my Jenkinsfile.

def polarisValue = false
def blackduckValue = false

if (env.BRANCH_NAME.startsWith("develop") || env.BRANCH_NAME.startsWith("hotfix")
|| env.BRANCH_NAME.startsWith("release")) {
polarisValue = true
blackduckValue = true
}

pipeline {
agent { node { label 'gradle' } }

parameters {
booleanParam defaultValue: polarisValue, name: 'Polaris', description: 'Uncheck to disable Polaris'
booleanParam defaultValue: blackduckValue, name: 'BlackDuck', description: 'Uncheck to disable BD scan'
}

stages {
// ...
}
}

基于谷歌代码审查(Code Review)法则的思考与实践

背景

代码审查(Code Review),就是让别人来审查你的代码,其目的就是确保代码库的整体代码运行状况随着时间推移而不断改善。

中国有句古话:三人行必有我师。

代码审查同样如此:

  • 他人的审查或许会有不一样的思考和建议;
  • 人都会犯错,多一个人检查就减少犯错的机率。

因此代码审查是你编写的代码在合并到主分支前最重要的一项检查工作,也是一项最直接、最低成本的发现软件中的错误绝佳方式。

既然代码审查这么重要,而且有这样显而易见的收益,但总能听到代码审查在团队里执行起来不容易、效果不理想的问题。问题出在哪呢?

据我观察有两点原因:

第一,读别人代码需要花时间,往往还需要代码提交者带着业务为审查者讲一遍,同时占用双方时间;
其次,如果代码审查者工作繁重、压力大而没有时间,也很容易造成执行不到位,走过场;

如何才能比较好的开展代码审查?让我们先来看看大公司是怎么做的,Google 的这篇关于代码审查的文章里给出了具体法则。

Google 的代码审查法则

在进行代码审查时,应确保:

  • 代码经过精心设计
  • 该功能对代码用户很有帮助
  • 任何 UI 更改都是明智的,并且看起来不错
  • 任何并行编程都是安全完成的
  • 代码没有比需要的复杂
  • 开发人员没有实现他们将来可能需要的东西
  • 代码具有适当的单元测试
  • 测试经过精心设计
  • 开发人员对所有内容使用了清晰的名称
  • 注释清晰实用,并且主要说明Why而不是What
  • 代码已正确文档化
  • 该代码符合我们的样式指南

确保检查要求你检查的每一行代码,查看上下文,确保你在改善代码运行状况,并称赞开发人员所做的出色工作。

原文:https://google.github.io/eng-practices/review/reviewer/looking-for.html

代码审查法的落地

可见,想要更好的落地代码审查,需要先要确立法则,你可以根据实际情况对上述法则进行借鉴、删减或补充;

第二,作为技术领导应当积极布道,让开发者了解统一的代码审查法则;

第三,应当把法则里的具体规则尽可能地通过流程控制、自动化检查则纳入到 Pull Request 中。

另外提醒作为 Reviewer 要 Peaceful !!!在代码审查时注意不要带有“教育”性质的去给别人提出修改建议,那样很容易适得其反。

以下是一些不完全实践,供参考。

流程控制

规避任何不经 Review 的代码进入到主分支

以 Bitucket 为例。GitHub,GitLab 在设置上大同小异。

  • 打开分支权限设置里的选项 Prevent changes without a pull request 打开它。当然如果有需要可以在这个选项里添加 Exception,被添加的人可以不通过 Pull Reuqest 来提交代码。

  • 在 Merge Check 里开启 Minimum approvals 这个选项。比如设置 Number of approvals = 1,这样需要至少有一个 Reviewers 点击 Approve 按钮才允许 Merge。

自动化检查

通过CI流水线验证编译和测试

  • 建立自动化构建和测试 Pipeline,这样在创建 Pull Request 的时候可以自动构建、测试以及检查。Jenkins 的 Multi-branch pipeline 可以满足这个需求。

  • 开启 Bitucket 的 Merge Check 里 Minimum successful builds 选项,验证构建/测试结果,以防止任何没有通过构建和测试的代码可以 Merge 到主分支。

  • 另外,可以通过自行编写工具来实现,或可以集成其他 CI 工具来做检查,例如:

    • 针对 Pull Request 的修改历史来分析提交历史并推荐 Reiewer;
    • 通过 Lint 工具来检查编码规范;
    • 通过 REST API 检查是否需要压缩 Commits 来保证清晰的提交历史;
    • 通过 SonarQube 检查 Quality Gate 等。

实现自动化检查,可以帮助 Reviewers 将审查的工作精力放在代码的具体实现上,其他的交给工具。

最后

代码审查做的好不好,跟一个团队有没有良好的技术氛围,或者是否存在有技术领导力,有“品位”的技术大牛也是正相关的。

  • 如果团队里大多数都是有“品位”的工程师,他们会以写出优秀的代码(或挑刺)乐此不疲。
  • 相反如果团队不重视规范,只追求短期的绩效达成,只会让技术债越欠越多,产品越做越烂。

欢迎留言分享你的意见或建议。

Jenkins upgrade issue "Windows agents won't start" workaround

Today, when I tried to upgrade my team’s Jenkins server from Jenkins 2.235.1 to Jenkins 2.263.3, I met a problem that can not launch the Windows agent.

[2021-01-29 23:50:40] [windows-agents] Connecting to xxx.xxx.xxx.xxx
Checking if Java exists
java -version returned 11.0.2.
[2021-01-29 23:50:40] [windows-agents] Installing the Jenkins agent service
[2021-01-29 23:50:40] [windows-agents] Copying jenkins-agent.exe
ERROR: Unexpected error in launching an agent. This is probably a bug in Jenkins
Also: java.lang.Throwable: launched here
at hudson.slaves.SlaveComputer._connect(SlaveComputer.java:286)
at hudson.model.Computer.connect(Computer.java:435)
at hudson.slaves.SlaveComputer.doLaunchSlaveAgent(SlaveComputer.java:790)
...
...
at java.lang.Thread.run(Thread.java:748)
java.lang.NullPointerException
at hudson.os.windows.ManagedWindowsServiceLauncher.launch(ManagedWindowsServiceLauncher.java:298)

This issue had been raised in the Jenkins Jira project: JENKINS-63198 and JENKINS-63198

There is also a Windows Support Updates guide here that mentioned this problem.

Finally, I fixed this problem by the following steps:

  1. Update windows-slaves-plugin to the lastest version 1.7 (fixes for Jenkins 2.248+)

Then the error should be like this

[2021-01-30 23:53:40] [windows-agents] Connecting to xxx.xxx.xxx.xxx
Checking if Java exists
java -version returned 11.0.2.
[2021-01-30 23:53:47] [windows-agents] Copying jenkins-agent.xml
[2021-01-30 23:53:48] [windows-agents] Copying agent.jar
[2021-01-30 23:53:48] [windows-agents] Starting the service
ERROR: Unexpected error in launching an agent. This is probably a bug in Jenkins
org.jinterop.dcom.common.JIException: Unknown Failure
at org.jvnet.hudson.wmi.Win32Service$Implementation.start(Win32Service.java:149)
Caused: java.lang.reflect.InvocationTargetException
at sun.reflect.GeneratedMethodAccessor219.invoke(Unknown Source)
at sun.reflect.DelegatingMethodAccessorImpl.invoke(DelegatingMethodAccessorImpl.java:43)
at java.lang.reflect.Method.invoke(Method.java:498)
at org.kohsuke.jinterop.JInteropInvocationHandler.invoke(JInteropInvocationHandler.java:140)
Also: java.lang.Throwable: launched here
  1. Then change jenkins-agent.exe.config file. remove or comment out this line <supportedRuntime version="v2.0.50727" /> as below

also do this for jenkins-slave.exe.config in case it also exists.

<configuration>
<runtime>
<!-- see http://support.microsoft.com/kb/936707 -->
<generatePublisherEvidence enabled="false"/>
</runtime>
<startup>
<!-- this can be hosted either on .NET 2.0 or 4.0 -->
<!-- <supportedRuntime version="v2.0.50727" /> -->
<supportedRuntime version="v4.0" />
</startup>
</configuration>
  1. Then try to Launch agent.

If it still does not work and has this error message “.NET Framework 2.0 or later is required on this computer to run a Jenkins agent as a Windows service”, you need to upgrade your .NET Framework.

Here is a link for update .NET Framework.

Hopefully, this could help you to fix connect the issue of the Windows agent. Let me know in case of any questions.